
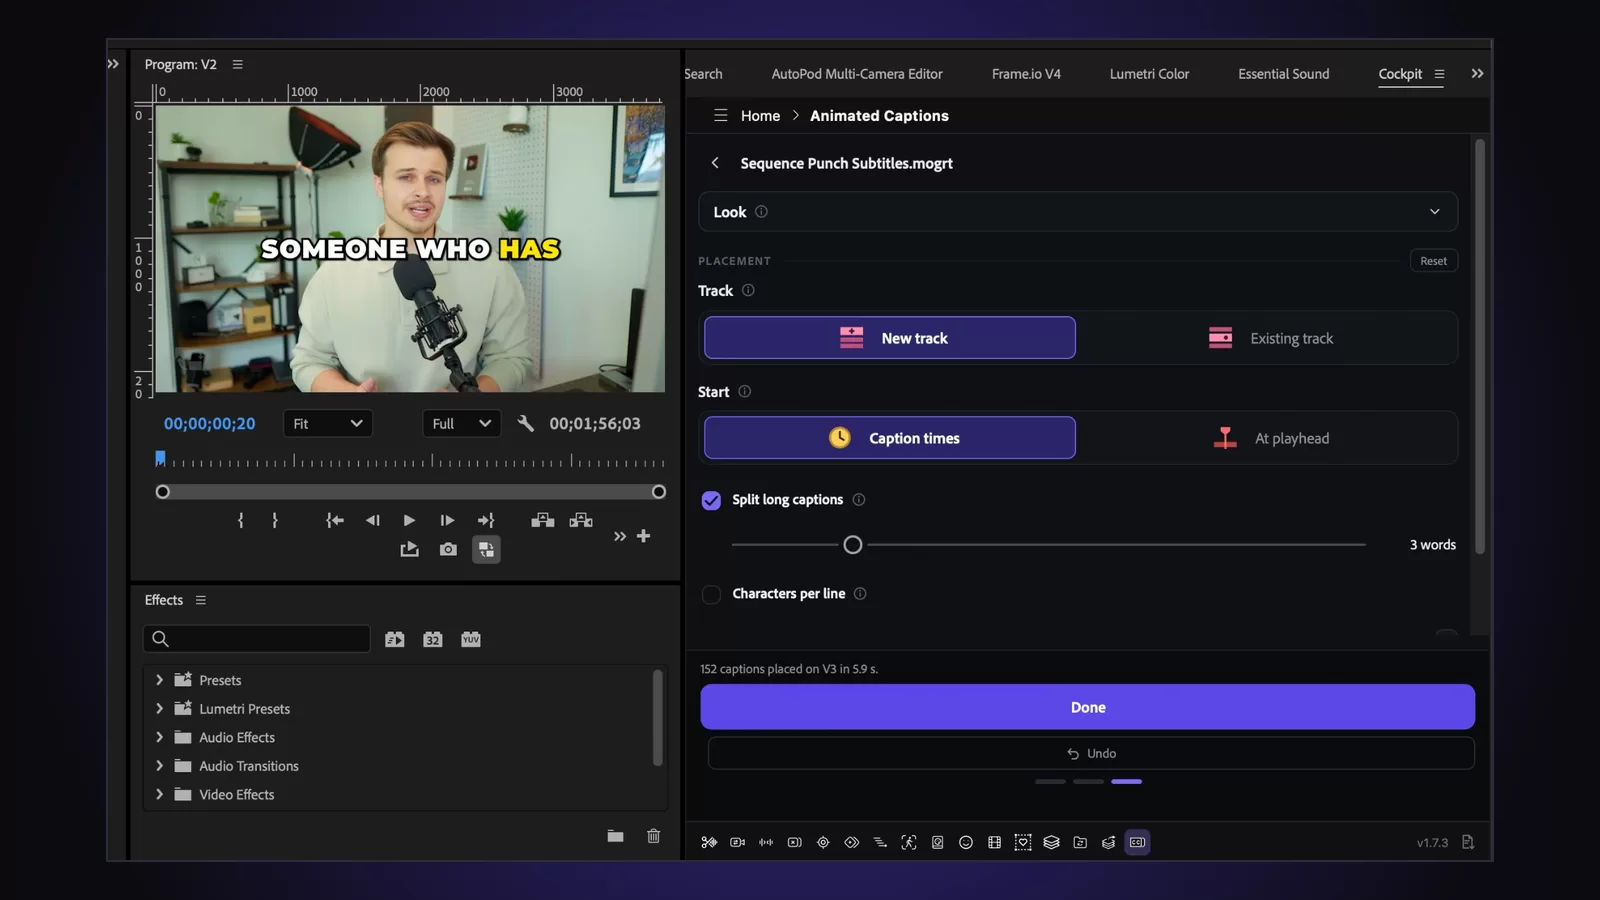
Adding captions to videos in Premiere Pro is pretty easy these days. But if you want those captions to have custom animations, colors, fonts, and effects, things can get complicated.
Maybe you've seen captions where words pop onto the screen, text slides into place, or individual words change color as someone speaks.
You can create these effects manually, but animating hundreds of captions throughout a video isn't exactly a fun way to spend your afternoon.
And if you already have a custom animated text template from After Effects, applying it to every caption individually can be just as tedious.
Fortunately, there are a few ways to make animated captions in Premiere Pro, including a method that lets you automatically generate them using your own Motion Graphics Templates (MOGRTs).
Method 1: Create captions with Premiere Pro's built-in tools
Premiere Pro includes automatic transcription and caption generation, so you don't need a third-party plugin just to add subtitles to a video.
Here's how to get started:
- Open your sequence in Premiere Pro.
- Go to Window > Text to open the Text panel.
- Select Transcribe sequence to generate a transcript from your audio.
- Review the transcript and correct any mistakes.
- Open the Captions tab and select Create captions from transcript.
- Choose your caption settings and click Create captions.
Premiere will automatically place captions on your timeline, synchronized with the dialogue.
You can customize their appearance using the Properties panel, including the font, size, color, and alignment.
What about single-word captions?
In Premiere Pro 26.3 and newer, Adobe also introduced a built-in option for generating single-word captions.
When creating captions from your transcript, open the captioning preferences and choose Single Word under the layout settings.
This displays one word at a time rather than a full sentence, which can work well for short-form videos.
For straightforward captions with basic styling, Premiere's native tools may be everything you need.
However, if you want more elaborate text animations or need to apply a particular After Effects MOGRT design throughout your video, you'll need a different workflow.
Method 2: Animate your captions manually
If you want more control over how your captions animate, you can turn your text into graphics and animate them using Premiere Pro's keyframes.
For example, you could create a simple pop-in animation by keyframing the Scale property.
Here's the general process:
- Create your captions using Premiere's built-in transcription tools.
- Select your captions and use Graphics and Titles > Upgrade Caption to Graphic, or the corresponding conversion command in your Premiere version.
- Select a graphic clip and open its animation controls.
- Add keyframes to properties like Scale, Position, or Opacity.
- Adjust the animation timing until you're happy with the result.
You can also create more elaborate animated text in After Effects and export the design as a MOGRT for use in Premiere Pro.
This is a good option when you want complete control over an animation.
The downside is that creating and applying individual animated graphics can become incredibly time-consuming when you're dealing with hundreds of captions.
Even if you've already made the perfect MOGRT, you still need a way to apply the template to your dialogue, update the text, and make sure every graphic appears at the right time.
That's where things get interesting.
Method 3: Generate animated captions using custom MOGRTs with Cockpit
Cockpit is a Premiere Pro plugin that includes an Animated Captions tool.
Instead of manually creating hundreds of animated text graphics, you can automatically generate captions using built-in animated templates or your own compatible After Effects MOGRTs.
You can also generate the captions directly from your video's audio using local AI, so you don't need to upload your footage or pay transcription fees based on the length of your video.
Here's how it works.
Step 1: Choose your caption source
Open Cockpit and select the Animated Captions tool.
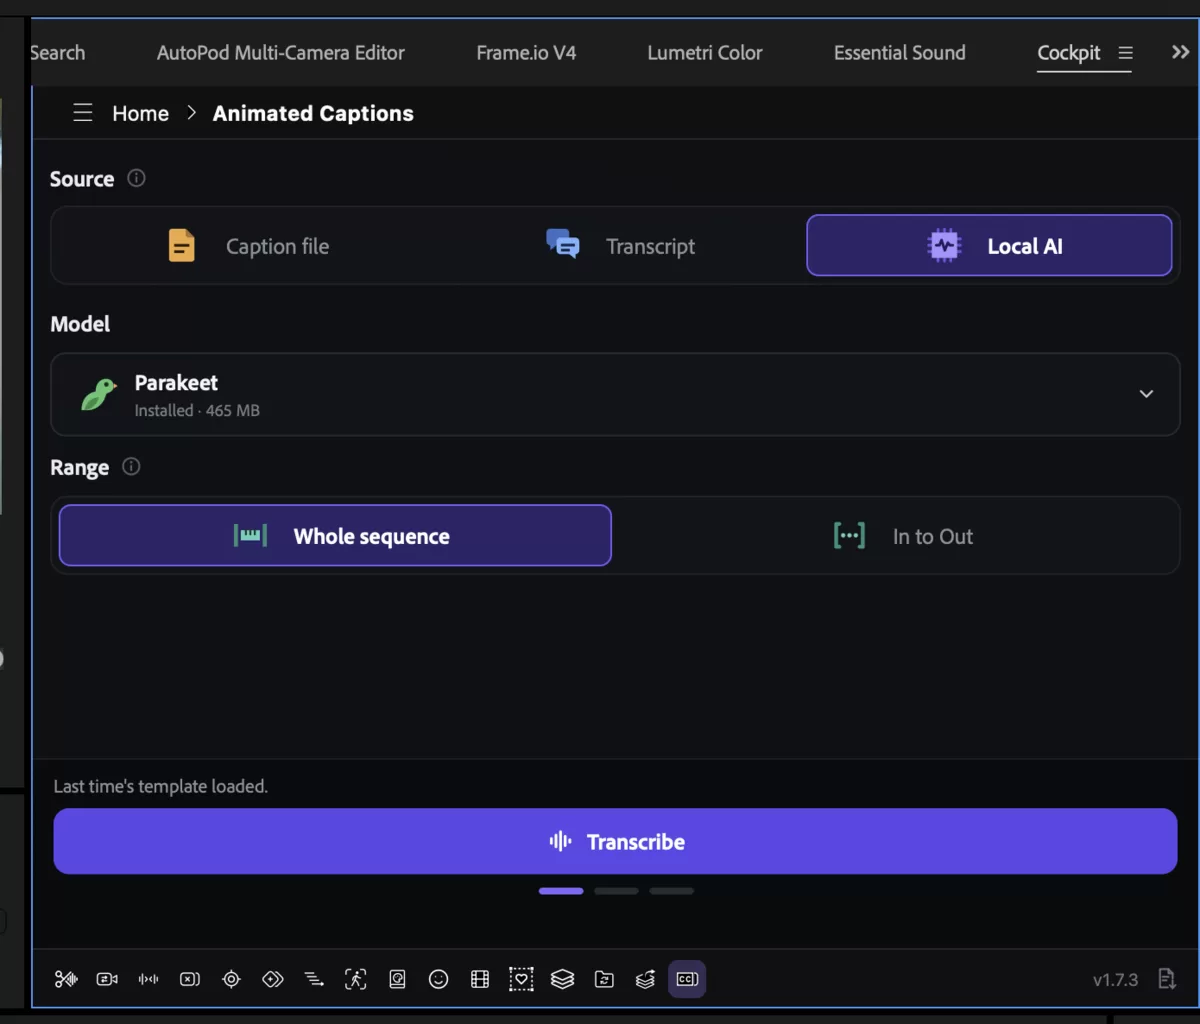
You'll see three options for where your captions should come from:
- Caption file: Import an existing SRT, VTT, or CSV caption file.
- Transcript: Use captions or a transcript you've already created in Premiere Pro.
- Local AI: Transcribe your video's audio directly on your computer.
If you're starting from scratch, Local AI is a convenient option.
You can choose from several transcription models, including NVIDIA Parakeet and Whisper, depending on your language and accuracy requirements.
The model downloads once, and subsequent transcription happens locally on your computer.
You can also choose whether to transcribe the whole sequence or just the section between your In and Out points.
Once transcription finishes, Cockpit generates a caption list with timing information that you can review before moving on.
Step 2: Choose an animated caption template
Once your captions are ready, it's time to choose how they should look.
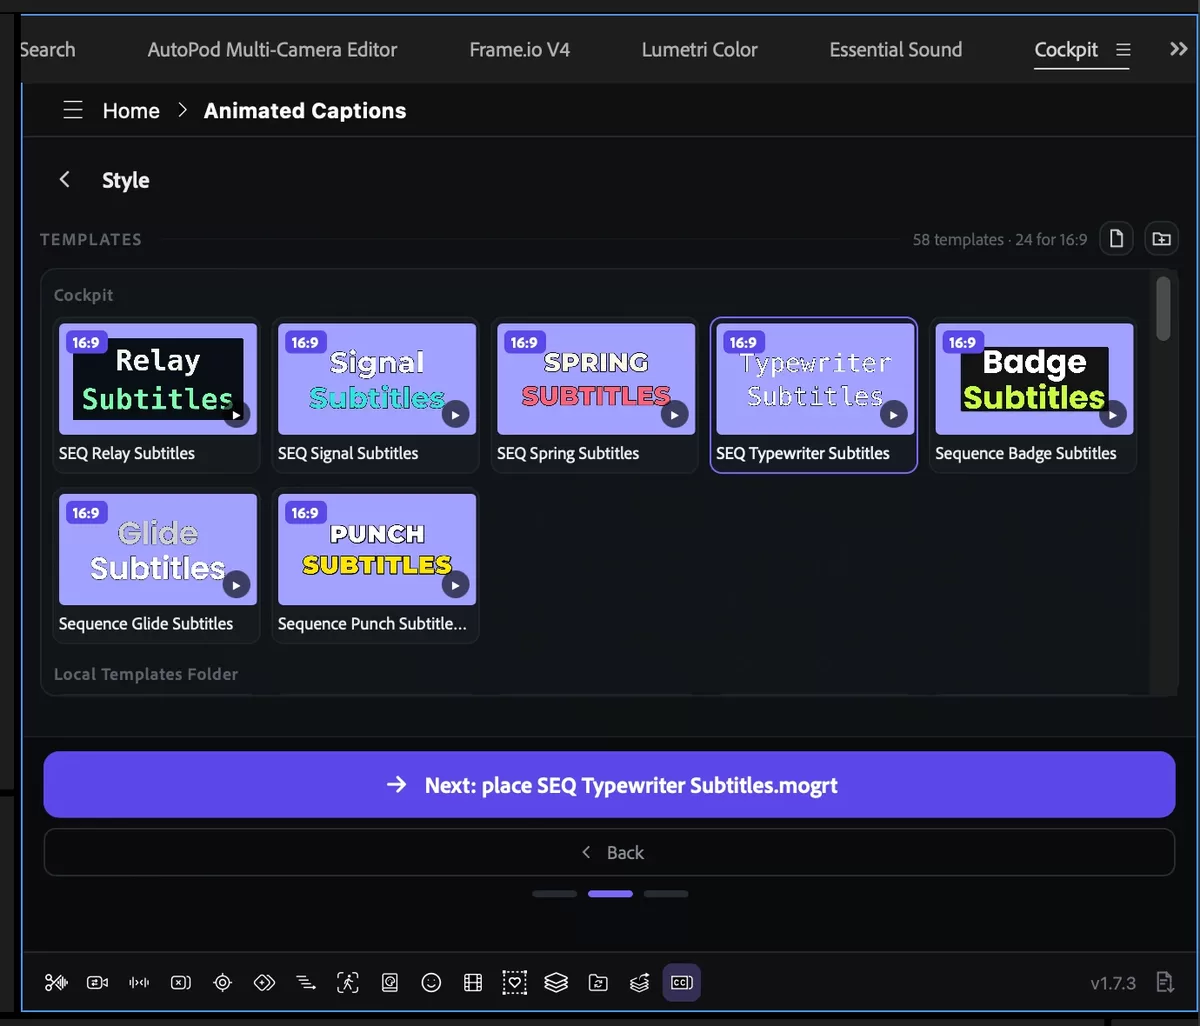
Cockpit includes a template browser with animated previews, making it easy to see what different styles look like before applying them.
You can choose from:
- Built-in Cockpit caption templates.
- Compatible templates already installed in Premiere Pro.
- MOGRTs from your local templates folder.
- Custom After Effects MOGRTs you've downloaded or created yourself.
This means you're not limited to a small selection of caption styles.
If you have a particular text animation you love, you can potentially use that same animation throughout your video.
For example, you might choose a simple typewriter animation for a tutorial, a bold pop-in effect for a YouTube Short, or a more subtle text reveal for a documentary.
Step 3: Customize the look
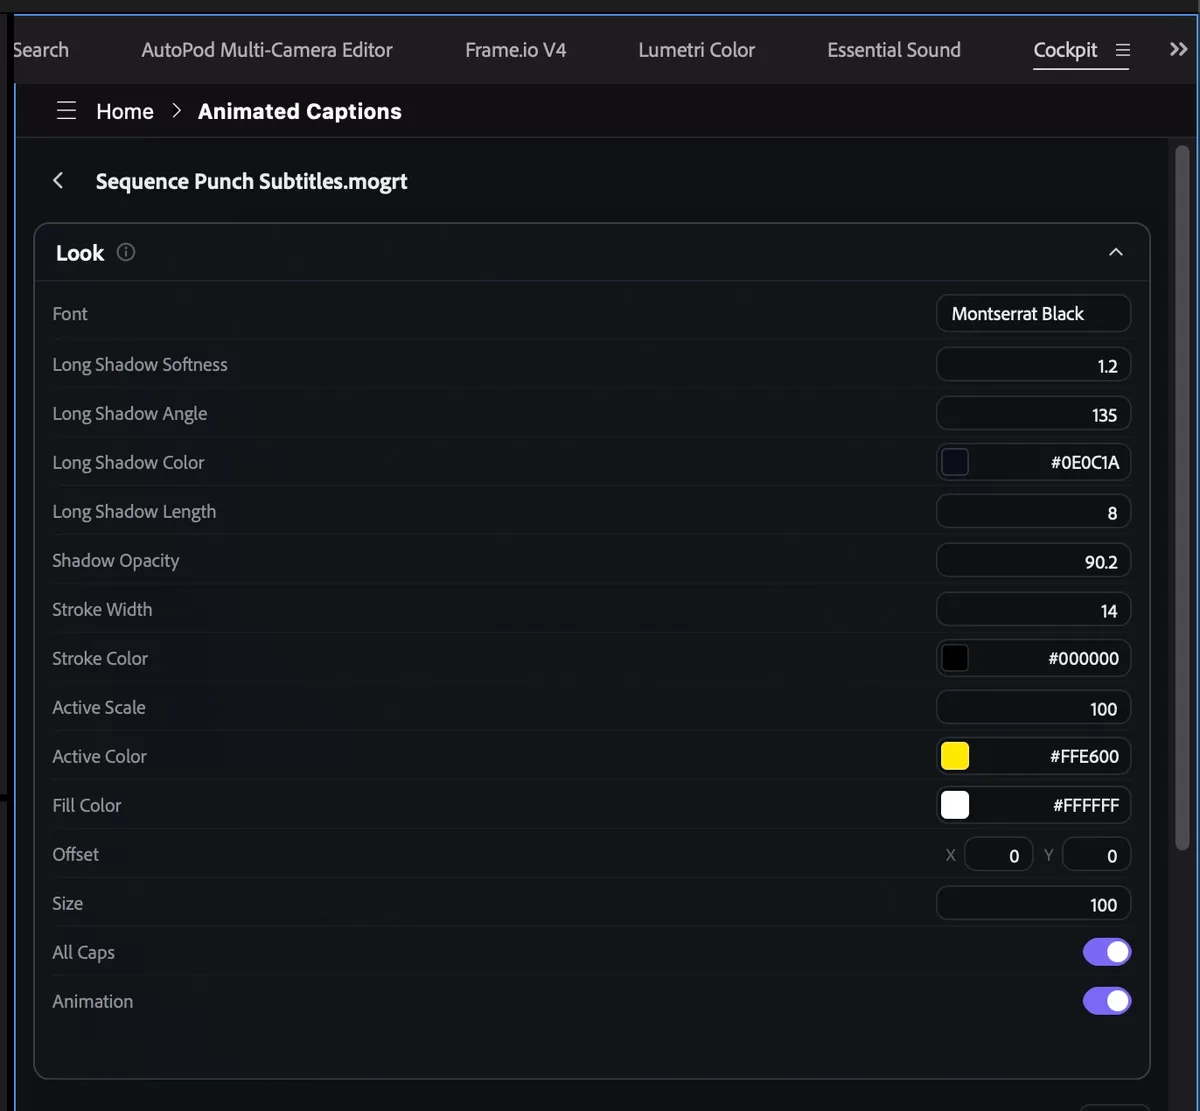
After selecting a template, Cockpit lets you customize the available settings before generating your captions.
The options depend on the MOGRT you're using, but supported templates can expose controls for things like:
- Font and text size.
- Text and highlight colors.
- Stroke and shadow settings.
- Position and scale.
- Animation settings.
For example, if you're using an animated caption style with white text, a black outline, and yellow highlights, you can adjust those settings to match the branding of your video.
And here's one of the most useful parts.
You only need to configure the appearance once.
Rather than manually updating every caption, Cockpit applies the selected settings across the generated graphics.
Step 4: Generate your captions
With your template selected and customized, you're ready to generate the captions.
Cockpit gives you several options for how the captions are placed on your timeline.
You can choose to create a new track above your existing footage or use an empty track you've already prepared.
You can also decide whether captions should follow their original timestamps or begin at the current playhead position.
If you're working with longer lines of dialogue, the Split long captions option can divide the text into smaller groups of words.
For example, instead of displaying an entire sentence at once, you could have each caption display three words before moving to the next group.
Cockpit uses the word timing information to align those caption changes with the dialogue.
Once everything is configured, click Generate.
Cockpit creates the animated captions on your timeline as individual MOGRT clips.
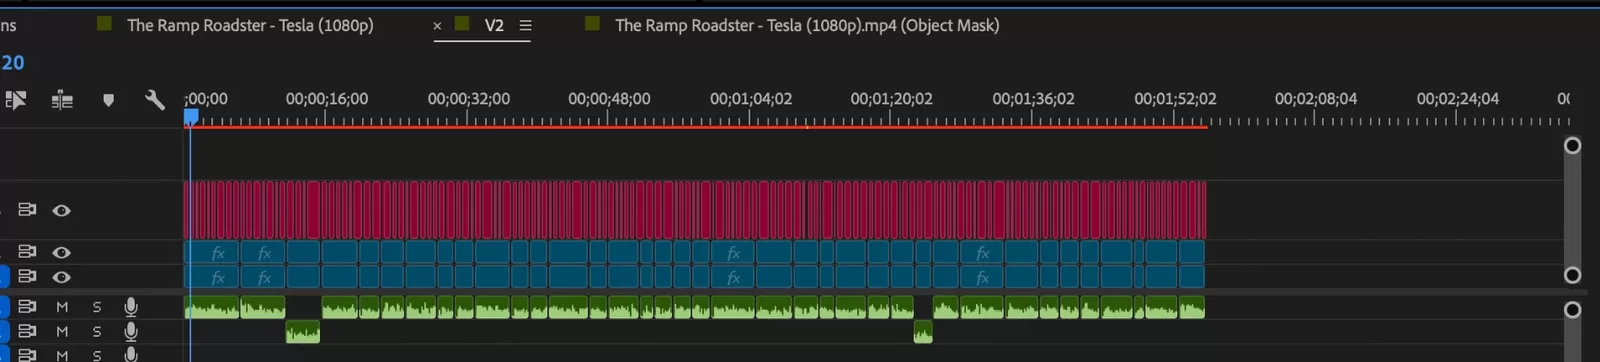
You can still move, trim, or delete the clips afterward, just like other graphics in Premiere Pro.
How to use your own MOGRT templates
One of the biggest benefits of Cockpit's Animated Captions tool is the ability to use your own After Effects templates.
If you already have a custom caption animation, you don't necessarily need to recreate it using a plugin's built-in design options.
However, there are a couple of requirements to keep in mind.
Your MOGRT needs an editable text control
To work with Cockpit, your MOGRT needs to be created in After Effects and expose a text control named Text.
This allows Cockpit to automatically insert the appropriate caption text into each generated graphic.
Templates created directly inside Premiere Pro aren't currently supported by this workflow.
If you're designing your own caption MOGRT in After Effects, make sure the editable text property is exposed correctly before exporting the template.
Use protected time regions for flexible animations
If your caption template contains animations, it's also worth setting up Responsive Design - Time in After Effects.
Protected time regions allow important parts of an animation to retain their timing when the overall duration of the graphic changes.
For example, you might want a caption to animate onto the screen quickly and then stay visible until the next caption begins.
Without a properly configured protected region, a MOGRT animation may not adapt as expected when caption durations vary.
This is particularly important for animations that need to work across captions containing different amounts of text.
Once your template is prepared, you can open it through Cockpit's template browser and use it to generate captions throughout your sequence.
Customize all your captions at once
Here's another useful feature if you regularly make videos with lots of captions.
Say you've generated 150 captions, but after watching the video back, you decide the font is too small or the highlight color doesn't work with your footage.
Normally, making changes to hundreds of individual graphics would be a hassle.
With Cockpit, you can adjust the template's Look settings and use Apply to placed captions to update the captions you've already generated.
That means you can experiment with different fonts, colors, sizes, and other supported template settings without rebuilding the entire caption track manually.
You can also reset the appearance to the template's original settings.
And if you decide you don't want the generated captions at all, Cockpit provides an option to remove the captions from that generation.
This makes it easier to experiment with different styles before settling on the one that works best for your video.
What's the easiest way to make animated captions in Premiere Pro?
If you just need simple subtitles or single-word captions, Premiere Pro's built-in transcription tools are a good place to start.
If you want complete creative control over a specific text animation, you can create your own graphics and animate them manually.
But if you're regularly making videos with custom animated captions, manually applying MOGRTs and updating every line of text can become pretty tedious.
That's where Cockpit's Animated Captions tool can help.
You can transcribe your footage locally, choose a caption template, customize its appearance, and automatically generate animated graphics directly on your Premiere Pro timeline.
And if you already have an After Effects MOGRT you like, you can use that too, provided it's compatible.
Instead of spending hours building animated captions one by one, you can get them onto your timeline and focus on the rest of your edit.
Cockpit also includes tools for other repetitive jobs, like searching and applying effects from your keyboard and batch exporting individual clips once your captioned videos are ready to deliver.
Try Cockpit free for 14 days and see how much time you can save creating animated captions.
Cockpit's Animated Captions tool requires Premiere Pro 26.2 or newer, along with the Cockpit Helper, which the Cockpit installer sets up for you.
Frequently asked questions
Can you automatically generate animated captions in Premiere Pro?
Yes. Premiere Pro can generate captions from a transcript and supports single-word caption layouts in version 26.3 and newer.
For more elaborate animations, plugins such as Cockpit can generate animated captions using compatible After Effects MOGRT templates.
Can I use my own MOGRTs for captions?
Yes. Cockpit supports compatible MOGRTs created in After Effects.
The template needs an exposed text control named Text. For animations that need to adapt to different caption durations, properly configured protected time regions are also important.
Not every MOGRT will be compatible without modifications.
Can Cockpit generate captions without uploading my footage?
Yes. Cockpit offers local AI transcription, which processes your audio directly on your computer.
Speech models need to be downloaded initially, but once installed, transcription doesn't require uploading your footage to a remote transcription service.
Can I import SRT files and turn them into animated captions?
Yes. Cockpit's Animated Captions tool supports importing SRT, VTT, and CSV caption files.
You can then choose a compatible animated template and generate MOGRT clips from the imported caption timing and text.
Can I change the appearance of all my captions afterward?
Yes. Cockpit includes an Apply to placed captions option that updates the supported appearance settings across the captions generated by the tool.
Does Cockpit support word-by-word highlighting?
Cockpit can use word-level timestamps to split captions into shorter, precisely timed clips.
However, this is different from karaoke-style highlighting, where individual words change appearance inside the same caption as they're spoken. That specific behavior isn't currently driven by Cockpit's word timing system.