
Ever wanted to make text follow a moving object in Premiere Pro?
Maybe you want a name label to follow someone as they walk across the screen, a graphic to stick to a moving car, or a logo to follow a product in a shot.
This is called motion tracking, and it's a pretty common technique in video editing.
The problem is that while Premiere Pro has built-in tracking tools, getting text or graphics to follow that motion isn't always straightforward.
You can manually animate the movement with keyframes or send your footage to After Effects, but both approaches can take quite a bit of time.
Fortunately, there are a few ways to accomplish this, including a method that lets you track objects and attach text directly inside Premiere Pro.
Method 1: Manually motion track text with keyframes
The most straightforward way to make text follow an object in Premiere Pro is to manually animate its position using keyframes.
This method doesn't require any additional software or plugins, and it works well for simple movements.
Here's how:
- Import your footage into Premiere Pro and place it on your timeline.
- Create a text layer using the Type tool and place it on a video track above your footage.
- Select the text layer and open the Effect Controls panel.
- Find the text's Position property and enable keyframing using the stopwatch icon.
- Move your playhead forward a few frames and reposition the text so it follows your subject.
- Continue adding keyframes throughout the clip, adjusting the position as the object moves.
Premiere Pro will interpolate the movement between your keyframes, creating the appearance that the text is following the object.
For example, if someone is walking from the left side of the screen to the right, you can gradually move the text alongside them.
This works fine when the movement is predictable.
However, if your subject moves quickly, changes direction, or moves around unpredictably, you may need to create dozens of keyframes to keep the text properly aligned.
And manually adjusting all those keyframes can get tedious pretty quickly.
Method 2: Motion track text using After Effects
Another option is to use After Effects, which includes more advanced motion tracking tools.
Instead of manually animating every movement, After Effects can analyze footage and generate tracking data based on a moving object.
You can then apply that motion to text, graphics, or other layers.
Here's the general workflow:
- Select your footage in the Premiere Pro timeline.
- Right-click and choose Replace With After Effects Composition.
- Once After Effects opens, select your footage layer and open Window > Tracker.
- Choose Track Motion to create a tracking point.
- Position the tracking point over a recognizable part of your subject.
- Analyze the movement and correct any tracking errors.
- Apply the tracking data to a null object or another target layer.
- Create your text and parent it to the tracked null object, positioning it where you want it to appear.
Once the tracking is complete, your text will follow the motion of the selected object.
And because you're using Adobe Dynamic Link, your After Effects composition can update directly inside Premiere Pro without needing to export a separate video file.
After Effects also offers more advanced tracking options, making it useful for complicated motion graphics and visual effects.
The downside is that you're working between two different applications.
If you're already comfortable with After Effects, that might not be a problem. But if all you want is a simple title following a moving object, it's a lot of extra setup.
Fortunately, there's another way to do it without leaving Premiere Pro.
Method 3: Automatically motion track text with Cockpit
Cockpit is a Premiere Pro plugin that includes a Tracker tool, allowing you to track moving objects and apply that motion to text, logos, and graphics directly inside Premiere Pro.
Instead of manually creating position keyframes or switching to After Effects, you can generate tracking data and transfer it to another clip in your timeline.
That's how the title at the top of this post stays locked to the runner's head, without a single hand-placed keyframe.
And you have three different ways to track your subject, depending on the type of footage you're working with.
Step 1: Prepare your footage and text
Before tracking anything, make sure your footage and text are set up correctly.
- Place your footage on a video track in Premiere Pro.
- Add your text or graphic on a track above the footage.
- Make sure both clips overlap for the duration you want to track.
- Open Cockpit and launch the Tracker tool.
For example, if you want a name label to follow someone's head, place the text roughly where you want it to appear.
You can adjust its position later.
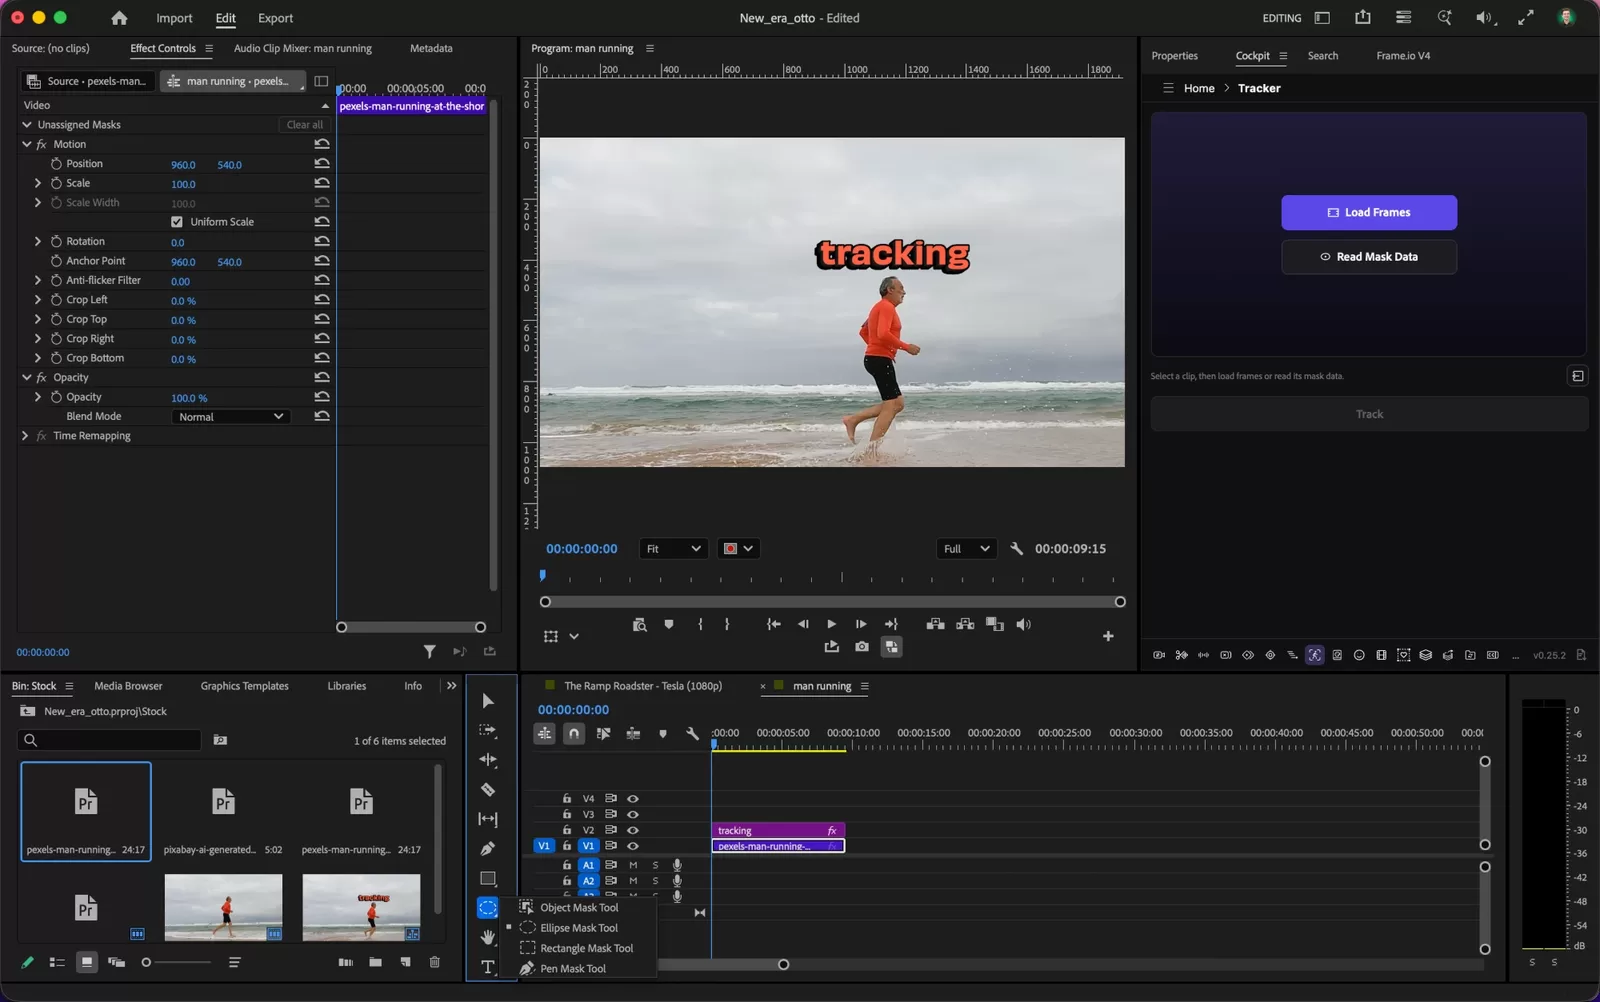
Step 2: Track your subject
Cockpit offers three methods for generating motion tracking data.
The best method depends on what you're trying to track.
Option A: Track with a mask (recommended)
For most clearly defined objects, using Premiere Pro's built-in mask tracking is a good place to start.
Cockpit can read the tracking data from a mask and use it to animate another clip.
Here's how:
- Select your footage clip in the timeline.
- Pick the Ellipse, Rectangle, or Pen Mask Tool from the toolbar and draw a mask around the object you want to track. In older versions of Premiere Pro, you'll find the mask tools under Opacity in Effect Controls.
- Keep the mask fairly tight around your subject, avoiding unnecessary background.
- In Effect Controls, use the mask's Track selected mask forward button to track its movement through the clip. If necessary, track backward to cover earlier frames.
- Once Premiere finishes tracking, keep the footage clip selected.
- Open Cockpit's Tracker and click Read Mask Data.
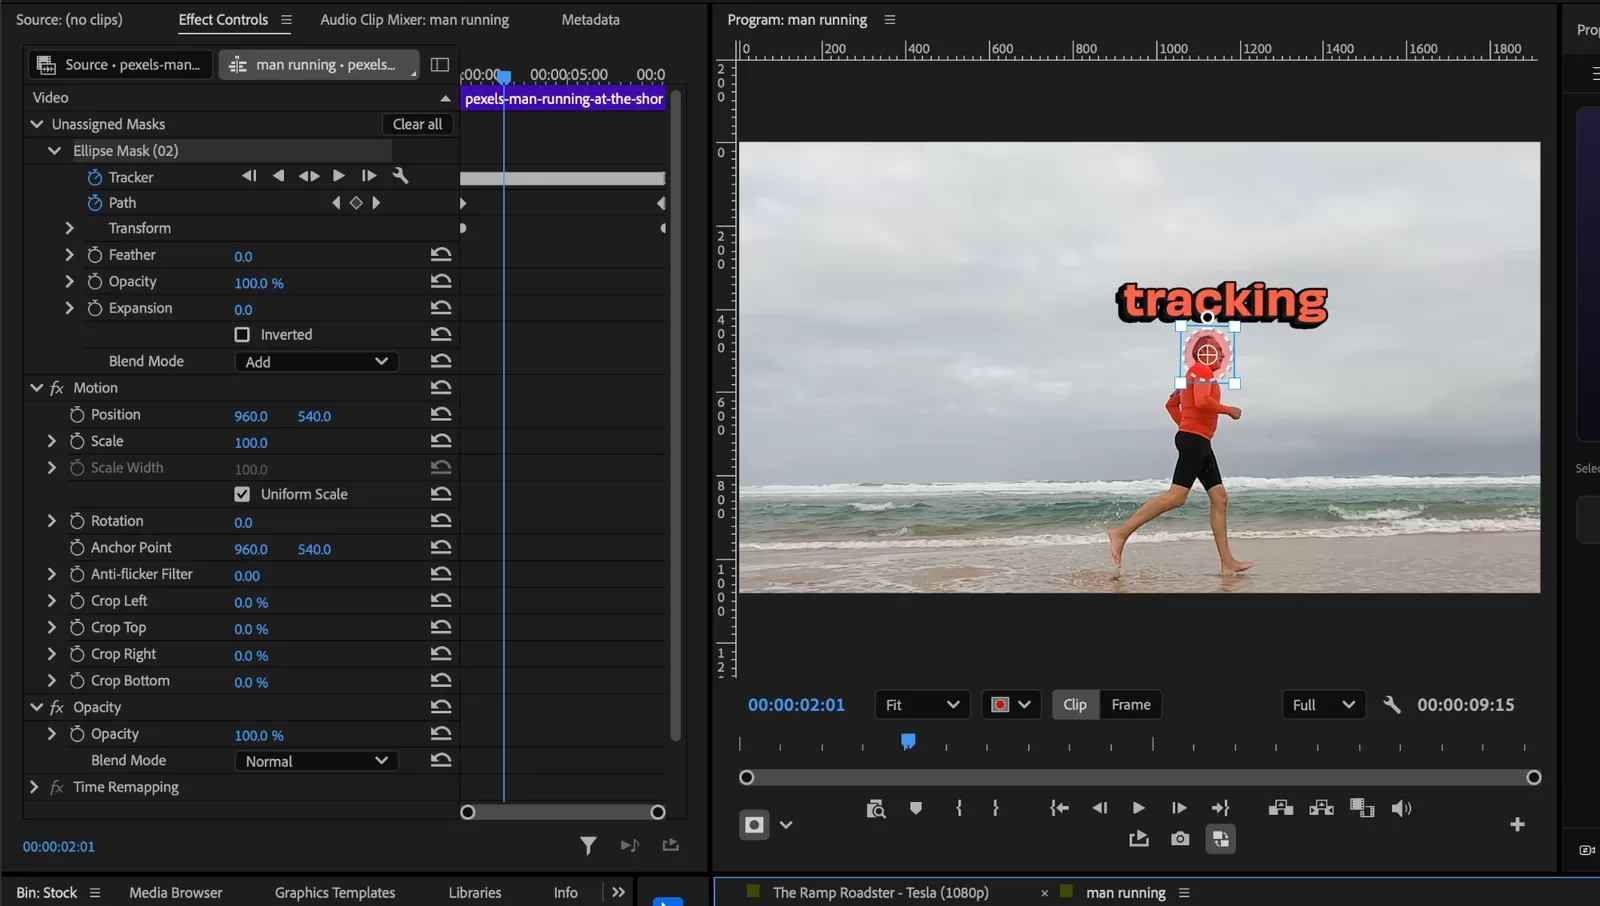
Cockpit will save the project and import the mask's tracking information.
If your footage contains multiple tracked masks, you'll be prompted to choose which one you want to use.
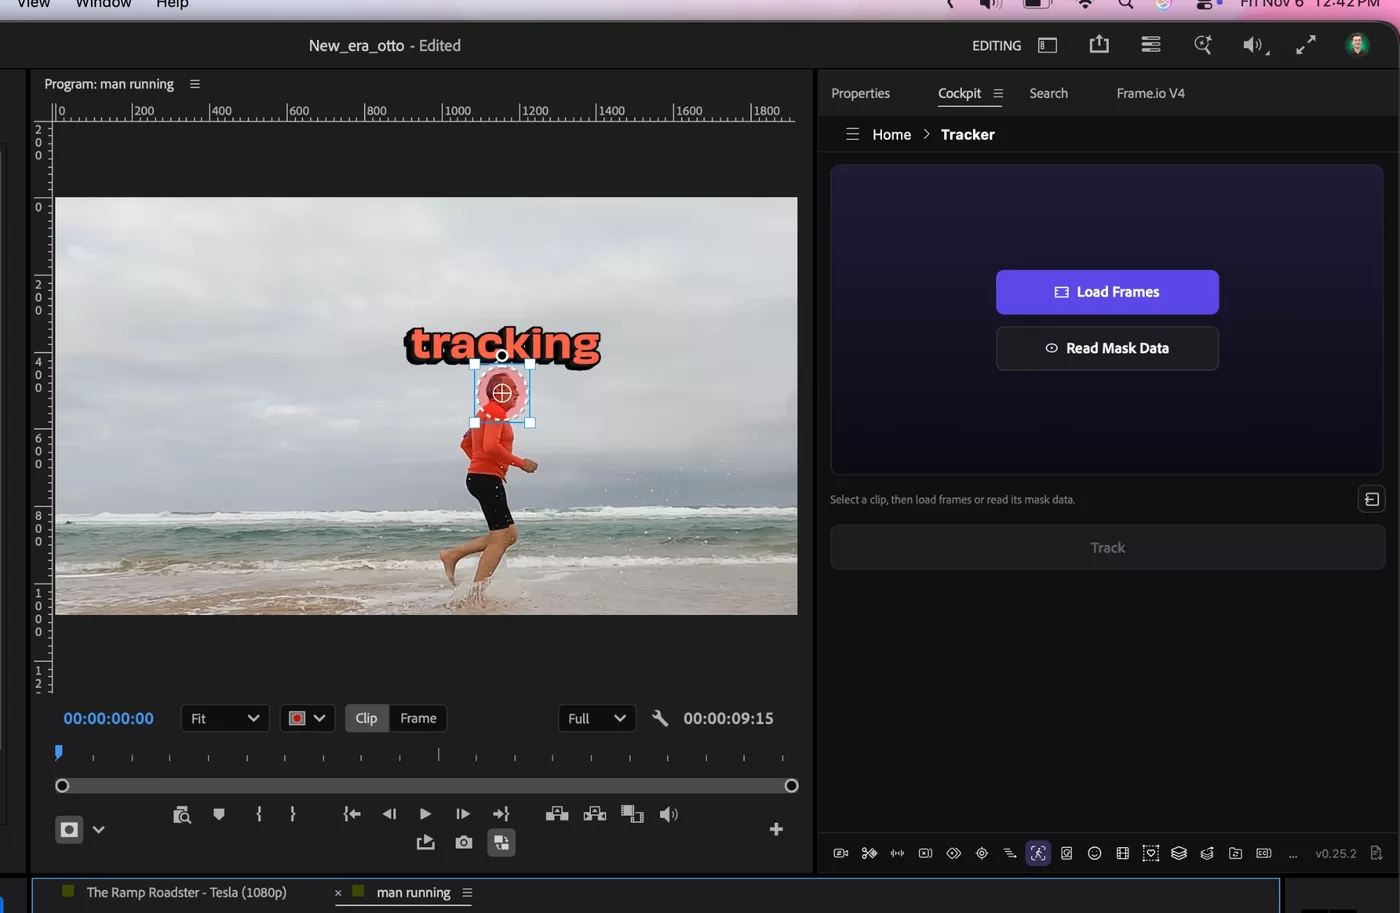
This is usually the most accurate option when you're tracking an object with a clear, recognizable shape.
And once you've applied the tracking data to your text, you can remove the original mask if you no longer need it.
Option B: Track with an Object Mask
If your subject has a more complicated shape, such as a person or an animal, you can also use Premiere Pro's Object Mask feature.
Object Masking uses AI to identify and isolate subjects, allowing you to track more complicated shapes without manually drawing around them.
Here's how:
- Select your footage clip in Premiere Pro.
- Choose the Object Mask Tool from the toolbar's mask tools.
- Select the object you want to track.
- Let Premiere finish analyzing and tracking the object.
- Open Cockpit's Tracker and click Read Mask Data.
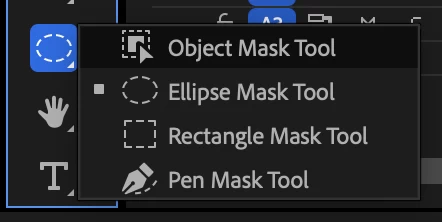
Cockpit can then use the tracked Object Mask to generate motion data for your text or graphic.
This can be particularly useful for subjects that would be difficult to track using a simple rectangle or ellipse.
However, Object Mask tracking isn't always as precise for this purpose as a carefully drawn mask, so it's worth reviewing the results.
Option C: Track a point without using a mask
If you don't want to create a mask, Cockpit also includes its own point tracking workflow.
This lets you select a specific point on your subject and have Cockpit follow it across the footage.
Here's how it works:
- Select your footage clip and open Cockpit's Tracker.
- Click Load Frames to display reference frames from your clip.
- Click the subject on each reference frame, choosing the point you want to follow.
- Click Start tracking.
- Review the tracking results using the strip beneath the preview.
Cockpit highlights sections of the track that may need attention in red.
If you notice a section where the tracker loses your subject, you can select that range, reposition the tracking point, and re-track just that section.
You can also adjust settings such as tracking detail, search radius, and smoothing if you're having trouble getting a reliable result.
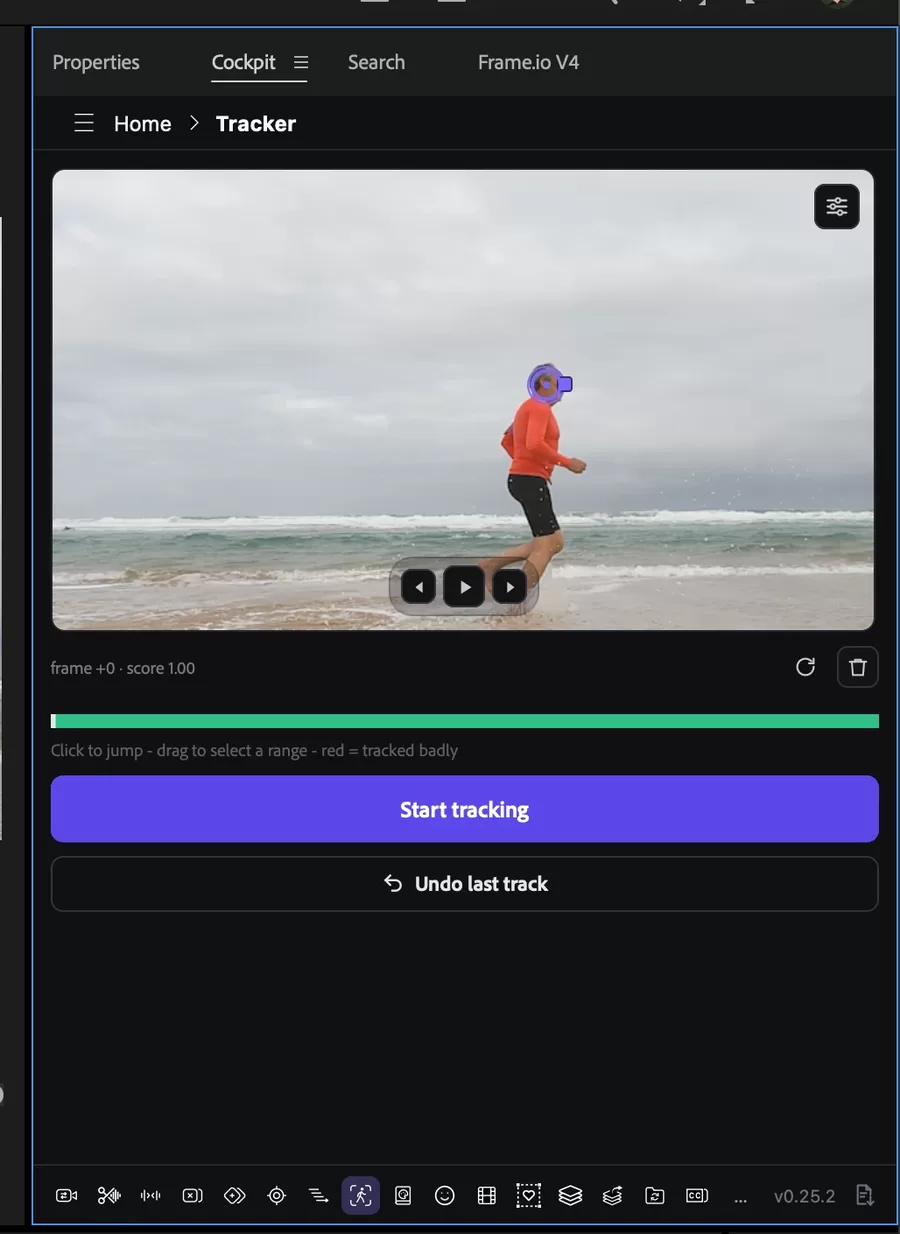
This method is useful when you have a recognizable point to follow but don't want to create a mask.
Choosing the best tracking method
Here's a quick breakdown of when I'd use each option.
| Tracking method | Best for |
|---|---|
| Mask tracking | Objects with a clear shape or outline |
| Object Mask tracking | People, animals, and more complicated shapes |
| Point tracking | Following a specific spot without drawing a mask |
If your subject has a clear shape, I'd generally start with a manually drawn mask.
For more complicated shapes, try Object Masking.
And if you just want to follow a specific point, Cockpit's point tracker is a convenient alternative.
Attach text or graphics to your motion track
Once you've generated your tracking data, you're ready to apply it to your text or graphic.
This is where Cockpit comes in particularly handy.
Instead of manually copying tracking keyframes or rebuilding the motion, you can apply the tracking data directly to another clip.
Here's how:
- Position your text or graphic where you want it to appear relative to the tracked object.
- Select your text or graphic clip in the timeline, rather than the original footage.
- In Cockpit's Tracker, choose Track items.
- Choose which properties you want to track: Position, Rotation, or Scale.
- Adjust the Amount setting to control how closely the graphic follows the movement.
- Enable Overwrite existing keyframes if you want to replace any existing animation.
- Click Apply.
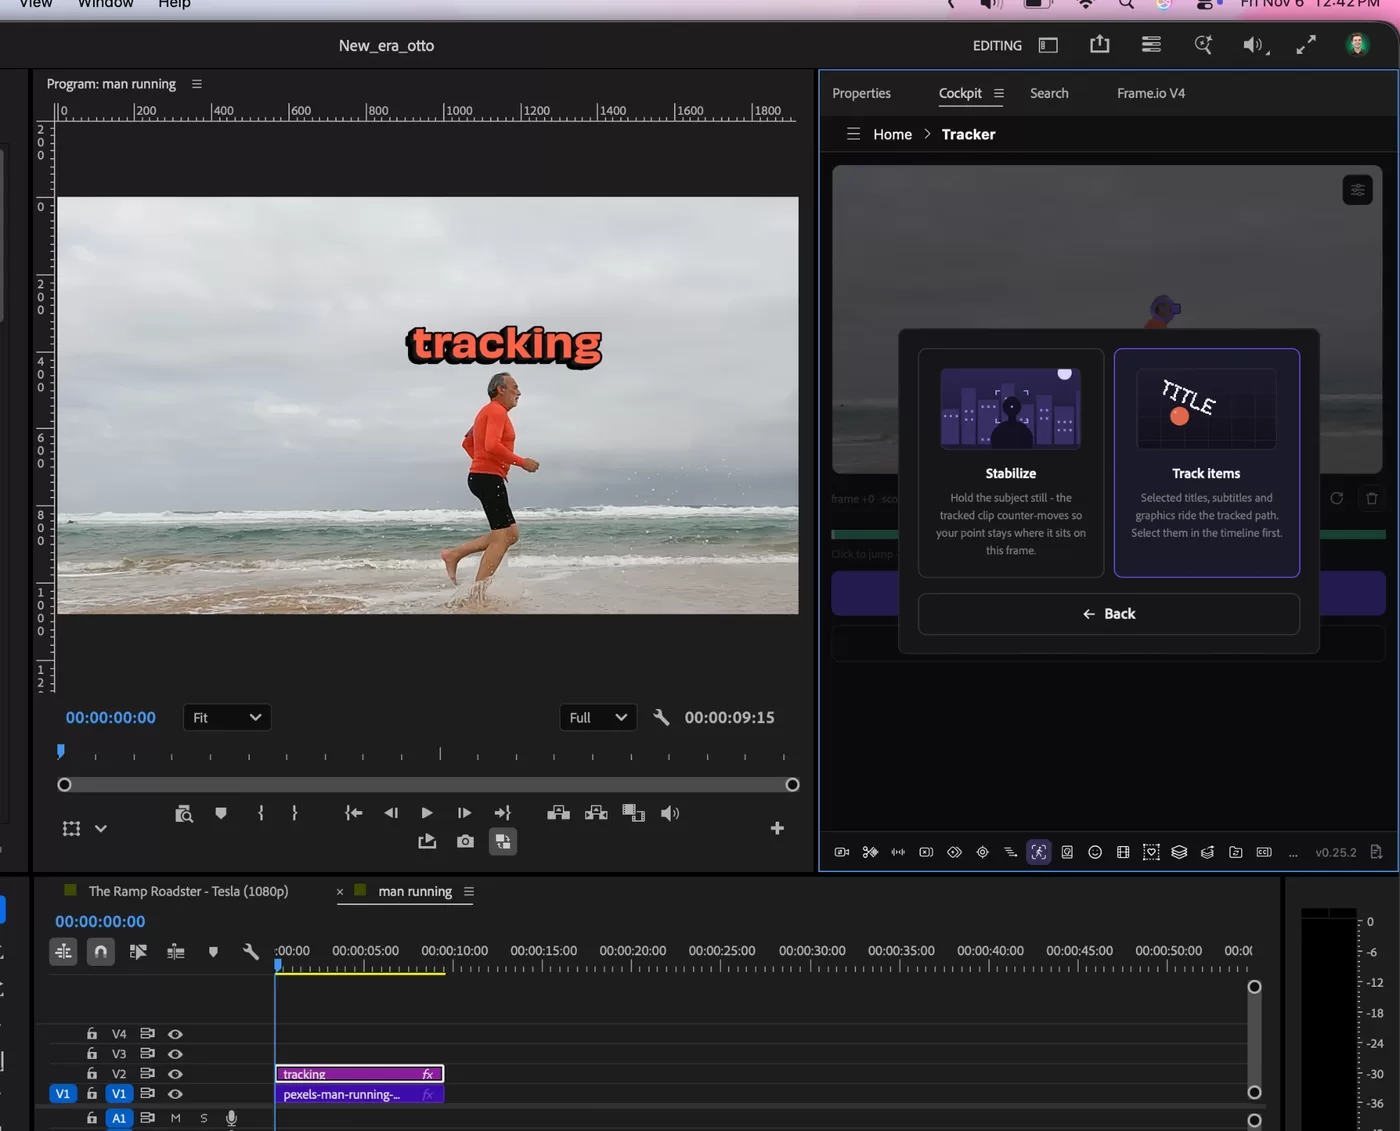
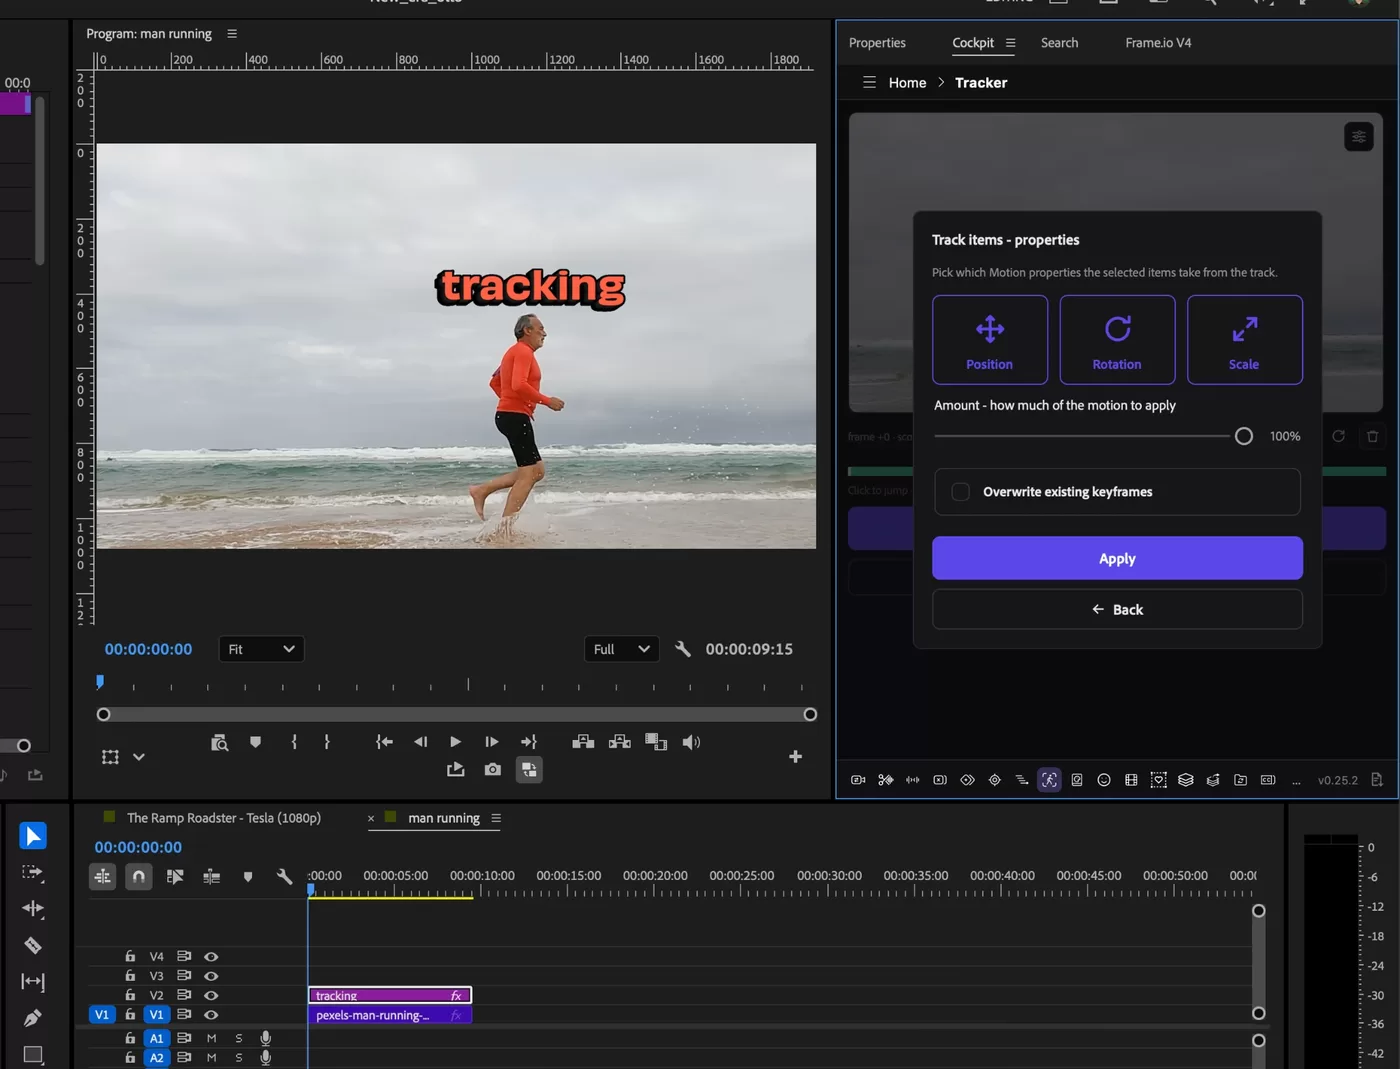
Cockpit will apply the tracking data to your selected graphic.
Now when you play the video, your text should follow the motion of the tracked object.
It works the same way on any subject, not just people. Here, a label and pointer ride along with a car on the highway:
Adjust how closely your text follows the object
One particularly useful option is the Amount setting.
At 100%, your text follows the tracked movement exactly.
But you can also lower the amount to create a softer, more subtle follow.
For example, if you're tracking someone's head, you might not want the text to bounce around with every tiny movement.
Reducing the tracking amount can create a smoother, slightly floatier animation.
You can also choose to track only Position without applying Rotation or Scale.
For most text labels, Position alone is usually a good starting point.
And if you're not happy with the results, you can use Undo last track or press Ctrl + Z on Windows or Cmd + Z on Mac to return to your previous settings.
Bonus: Stabilize your footage using the same track
Cockpit's Tracker can also use tracking data to stabilize footage.
Instead of applying the motion to a text layer, you can use the Stabilize option to compensate for the tracked object's movement.
Simply choose a reference frame you want to hold steady, then apply stabilization.
This can be useful when you want to keep a particular subject in roughly the same position throughout a shot.
It's a different approach from Premiere Pro's Warp Stabilizer, which is designed to reduce unwanted camera shake across the overall image.
Tips for better motion tracking
Regardless of which method you're using, a few things can make a big difference to your tracking results.
1. Choose a recognizable tracking point
Motion tracking works best when your subject has a distinctive feature that remains visible throughout the clip.
For example, tracking the corner of a product, a logo on someone's shirt, or a high-contrast detail on a car can be more reliable than tracking a plain surface.
If your subject looks too similar to the surrounding background, the tracker may have trouble determining where it moved.
2. Avoid including too much background
If you're using mask tracking, try to keep your mask close to the object.
Including too much of the surrounding background can make it harder for the tracker to follow the correct movement.
A tighter mask generally gives the tracker more useful information about what you actually want to follow.
3. Watch out for fast movement and motion blur
Fast-moving objects can be difficult to track, especially when there's significant motion blur.
If your subject moves quickly or temporarily leaves the frame, you may need to correct the tracking data manually.
With Cockpit's point tracker, you can revisit problematic sections and re-track only the affected frames rather than starting over.
4. Don't track more properties than you need
Just because you can track Position, Rotation, and Scale doesn't mean you need all three.
For a name label following a person, Position may be enough.
For a logo attached to a rotating object, Rotation might also be useful.
The fewer properties you need to track, the easier it generally is to keep the animation looking natural.
What's the easiest way to motion track text in Premiere Pro?
If you're working with a simple movement, manually animating the Position property with keyframes might be all you need.
For more complicated tracking and visual effects, After Effects is still a powerful option.
But if your goal is simply to make text, a logo, or another graphic follow a moving object directly inside Premiere Pro, Cockpit's Tracker makes the process considerably easier.
You can use Premiere's existing mask tracking, its Object Mask feature, or Cockpit's own point tracker to generate the motion data.
Then apply that movement to your text or graphic without leaving Premiere Pro or manually animating every frame.
And since Tracker is just one of Cockpit's editing tools, you also get access to features like automatic podcast editing, animated captions, batch exporting, and keyboard-driven effect search.
Try Cockpit free for 14 days and see how much time you can save on your next edit.
Frequently asked questions
Can you motion track text in Premiere Pro?
Yes. You can manually animate text using keyframes, or use a plugin like Cockpit to apply tracked motion to text and graphics.
Premiere Pro also includes built-in mask tracking, although transferring that motion to other graphic layers may require additional steps or tools.
Can you make text follow an object without After Effects?
Yes. Cockpit's Tracker allows you to track objects and apply their movement to text or graphics directly inside Premiere Pro.
You can use mask tracking, Object Masking, or point tracking depending on your footage.
Can I motion track a logo or image instead of text?
Yes. Cockpit's Tracker can apply tracked movement to text, logos, and other graphic clips.
You can choose whether to transfer Position, Rotation, Scale, or a combination of those properties.
What's the difference between motion tracking and stabilization?
Motion tracking records how an object moves through a video.
Stabilization uses movement information to compensate for unwanted motion, helping keep a subject or image steady.
Cockpit's Tracker supports both workflows.
Do I need a plugin to motion track in Premiere Pro?
Not necessarily.
Premiere Pro has built-in mask tracking tools, and you can manually animate graphics with keyframes.
However, if you want to automatically transfer tracked movement to text or graphics without using After Effects, a plugin like Cockpit can simplify the process.